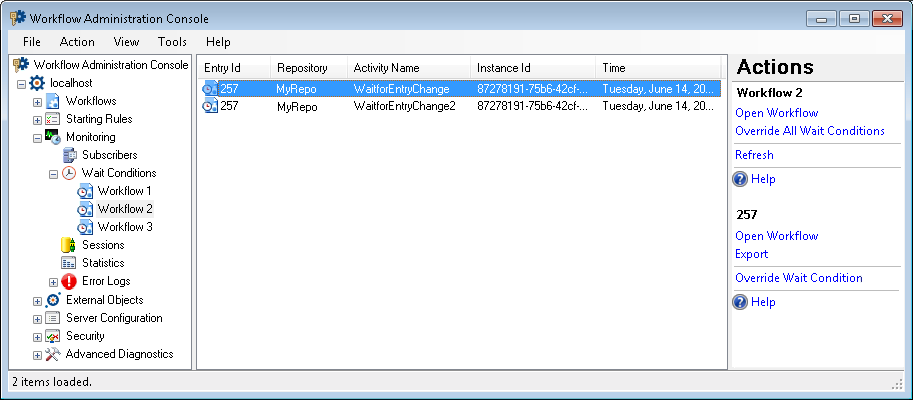
Wait Conditions Node
This node, under Monitoring in the Workflow Administration Console, lets you view information about, and interact with, wait conditions. The node shows active wait conditions, the ID number of the entry they are interacting with, the repository the entry is in, the name of the waiting activity, the workflow's instance ID, and the time they started waiting.
Optionally, you can view each wait condition's queue (the ID of the workflow queue that gets notified when the condition is satisfied or deleted) and internal ID (the primary key of the row in the condition database). More information.
Note: A wait condition pauses a workflow at a specified step until one or more conditions are satisfied. Wait conditions are used by Laserfiche Routing activities and the Wait for Entry Change activity.
To open this node
- In the Workflow Administration Console's Console Pane, expand the Monitoring node.
- Expand the Wait Conditions node. The node will list all the published workflows on the Workflow Server.
Tip: You can refresh this list to reflect recent changes by clicking the Refresh link below Wait Conditions in the Actions Pane. Alternatively, right-click the Wait Conditions node and select Refresh.
To override wait conditions from this node
When you override a wait condition, the workflow instance paused at that condition will stop waiting and continue normally -- even though the wait condition was never satisfied. If you choose to override all wait conditions for a workflow definition, all currently waiting workflow instances will immediately continue (regardless of what condition they were waiting on).
- To override one or more specific wait conditions
- In the Console Pane, select the workflow that the wait condition(s) you want to override are in.
- In the center Details Pane, select one or more wait conditions. Hold down CTRL to select more than one wait condition at a time.
- Select Override Wait Condition under the selected item's name in the Actions Pane. Alternatively, right-click the wait condition(s) and select Override Wait Condition.
- To override all wait conditions for a workflow
- In the Console Pane, select the workflow you want to override wait conditions for.
- Click Override All Wait Conditions in the Actions Pane. Alternatively, right-click the workflow and select Override All Wait Conditions.
Tip: If you cannot determine which wait condition you want to override from this list, search for the workflow instance that contains the relevant wait condition in the Workflow Designer. In the Search Results Pane, show the Instance ID column. More information. Note the Instance ID of the relevant workflow instance, and use the ID to find the correct wait condition in the Wait Conditions node.
To open a workflow from this node
- Select a workflow or any wait condition in a workflow.
- Click Open Workflow, either under the workflow's name or the wait condition's entry ID, in the Actions Pane. Alternatively, right-on a workflow or a wait condition and select Open Workflow.
- The selected workflow will open in the Workflow Designer.
To export a wait condition from this node
- In the Console Pane, select the workflow that the wait condition(s) you want to export are in.
- In the center Details Pane, select a wait condition.
- Click Export under the wait condition's entry ID in the Actions Pane. Alternatively, right-click a wait condition and select Export.
- Choose where you want to save the condition .xml file.
- Click Save.
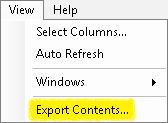
To export the contents of this node in a .csv, .xml, or .txt file
- Select the node in the Console Pane.
- Select View from the main menu.
- Click
 Export Contents.
 - In the Export data dialog box, name the exported file.
- Select CSV File, XML File, or Tab Delimited Text File from the drop-down menu.
- Click Save.